How to read drum sheet music: a beginner’s guide

25.03.2022 Ben Maloney Drums

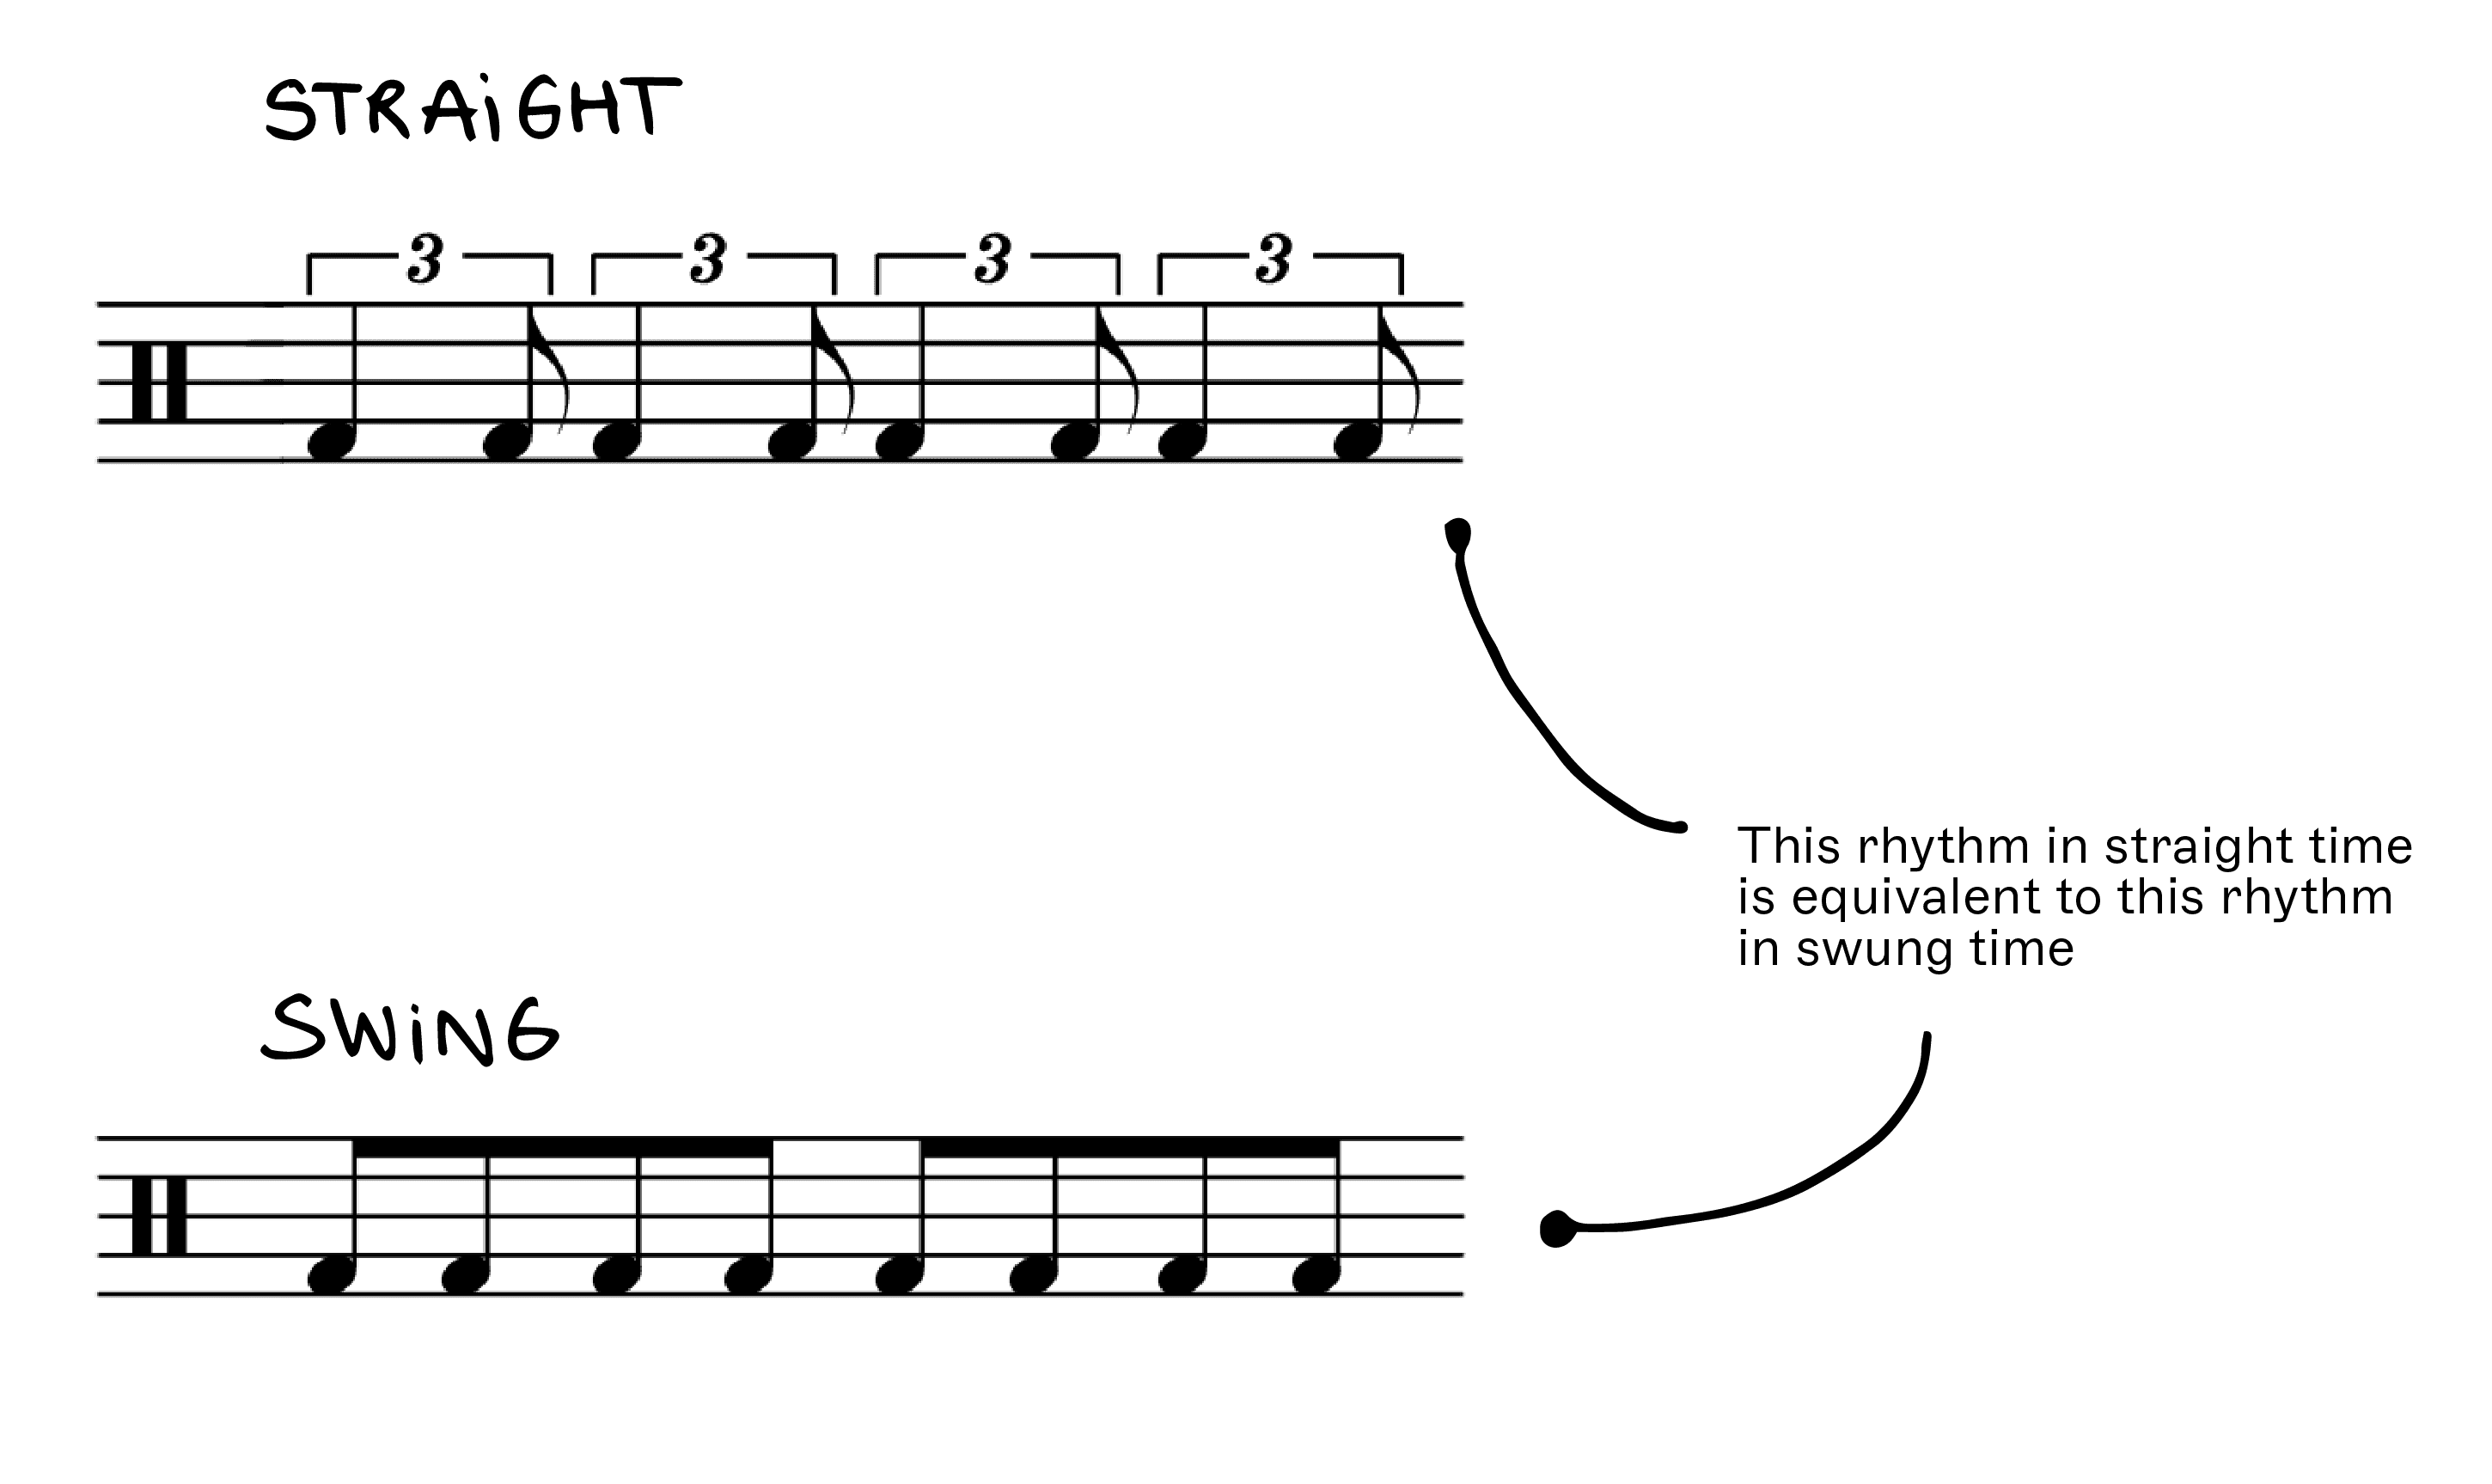
Visceral, intuitive, innate - these are just some of the terms that are often tossed around when it comes to drumming. And with good reason. Drumming competes with singing for the title of oldest performance practice in the world. It has a role in every musical tradition on the planet. Rhythm is something we can all instinctively get on board with. 

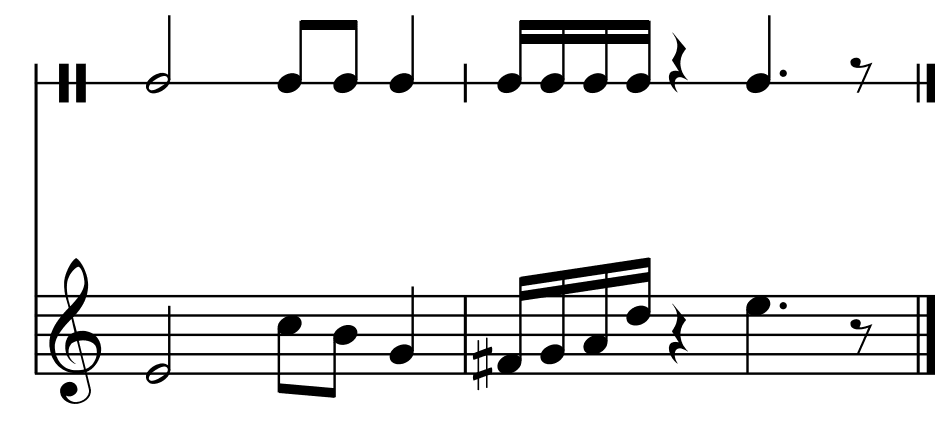
But these concepts don’t really resonate with the idea and characteristics of sheet music, which is fixed, calculated and cerebral. But despite this – or perhaps because of it – sheet music for the drum kit utilises one of the most singular systems in the world of notation. 

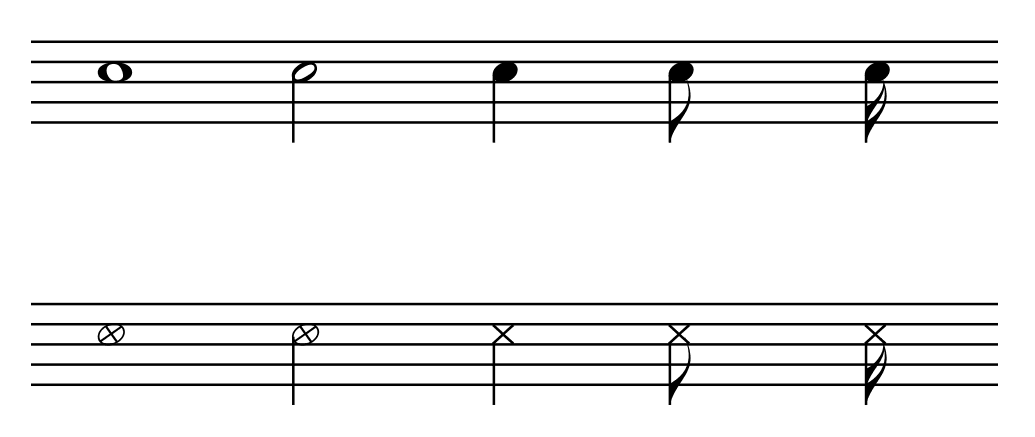
What makes it so special? It comes down to two factors. First, a kit is unpitched, meaning that standard notational principles don’t apply. But, you might counter, there are lots of unpitched percussion instruments out there, so what makes the kit special?

That leads us nicely to the second factor, which is that a drum set technically constitutes a collective of instruments. It’s a unique setup, and in short a unique notational method has been developed to cater to it.  

This article tells you everything you need to know about that method - how it works, and the steps you need to take to start reading it and - more importantly - start drumming.

Percussion sheet music
 

Let’s kick things off by looking at percussion sheet music more generally. As we said, the constituent parts of a drum kit are unpitched percussion instruments. Instruments of this type, such as a triangle or a bongo, can’t produce distinct tones with a determinable pitch. 

So, to play an instrument like this, a percussionist won’t need to know which note to play - They just need to know when to strike, brush, or shake the thing. These are instruments whose musical contribution revolves around rhythm, for which a unique type of musical notation has developed. 

Percussion sheet music is still written out in what’s known as staff notation (which uses the notes, lines and other elements that you can see below), but it isn’t written across the conventional five-line stave, whose lines and spaces designate certain musical pitches. Instead, sheet music for these instruments is written on a simpler, one-line stave.

You can see the slimline percussion stave and the standard five-line stave depicted above. Look at the former (top) and you’ll notice that all the notes are on that one line. Look at the latter (bottom) and you'll see that those notes are all over the place. The rhythm is the same, however - we'll come back to that.

On a five-line stave, the vertical placement of notes dictates the pitch to be played, and as there's a wide range of possible pitches, there's a wide range of lines and spaces to accommodate notes. In the case of the percussion stave, everything’s horizontal. 

Taking pitch out of the equation, therefore, the percussion stave functions kind of as a timeline, on which the positioning of notes simply corresponds to when the instrument should be played. 

Some percussion instruments can be played in a number of ways, or combine a few parts. Sheet music written for these instruments might add a parallel line or two to the stave - as below. On which line a given note appears will determine the playing action to be taken, but in most cases, there’s still no direct relationship to pitch, and rhythm is still paramount. 

Unlike the examples of individual unpitched percussion above, the kit combines a range of instruments in its arsenal – drums, cymbals, cowbells, and the rest. In this way, it offers a much wider musical palette, wide enough to necessitate a full, five-line stave, as well as a diversity of particular markings to fill it. 

No other instrument, at least in the Western tradition, works like that. And that’s precisely what makes it - and its sheet music - unique.

Step 1: Meet the drum stave
 

Forget time, forget rhythm. Let’s think vertically for a moment. While the lines and spaces might not signify certain pitches, in drum sheet music they signify certain motions. Below you’ll see a snapshot of the five-line drum stave, featuring notes. Also shown is what the placement and form of each note tells you, the drummer, to do when they appear. 

In other words, these symbols correspond to actions on the drum kit. When you see them, you have to perform that action. Don’t worry just yet about when you have to play them – that’s to do with rhythm, and we’ll see to that soon.

There are two things you should consider: the type of notehead that’s used - cross or circle - and the position of that notehead. 

Sometimes you’ll see a hollow circular notehead. Sometimes it’ll be a crossed notehead inside a circle. Sometimes you’ll see several notes in succession, joined by horizontal lines called beams. What each of those means is to do with rhythm, so don’t worry about that just yet. Just get familiar with what round and crossed noteheads can look like. 

For now, just think about which line or space on the stave the notehead is aligned with, and whether it’s a circle or a cross - that’s what indicates which part of the kit should be hit. Is it the snare drum or hi-hat? Should you be kicking the bass drum or striking the crash cymbal

Take some time to get familiar with the different instructions. Have a go at memorising what each note signifies before moving on to the next section.

Step 2: Understand rhythm
 

Let’s go back to that idea of the stave as a timeline. Think of it as a sequence of musical events - reading from left to right, you have to perform one motion after another, and sometimes even several at once. So, to use the previous extract as an example, you would have to play the bass drum, followed by the snare, followed by hi-hat, and so on. 

But how quickly? As fast as possible, or slowly? With regular gaps in between, or randomly spaced? All these aspects are governed by a range of musical parameters, each of which ultimately relates to timing, or -to be more precise, as all drummers ought to -  rhythm. 
 

Metre and pulse
 

In staff notation, music is broken down into bars. Bars can be understood as repeating, rhythmic building blocks. Each bar constitutes a unit of time and a grouping of beats, and  they help musicians to navigate their way through a piece of music.

The particular beat grouping that each bar comprises - a piece’s metre - is dictated by the time signature. This can be found at the far left of the stave, and it’s made up of two numbers, one placed on top of the other. Bear in mind that time signatures can change midway through a piece.

The top number indicates the number of beats per bar - easy enough - while the bottom number assigns a note value to each beat. Note value describes a note's duration relative to the bar in which it appears. That notion can be a little more difficult to understand, but we’ll come back to it in a moment. You can see what time signatures look like and how they can be broken down below.

Because bars come one after another, their corresponding beat groupings repeat. When musicians play music arranged in these beat groupings, at a specific and constant speed, a pulse is felt. 

It’s the pulse that listeners tap out with their feet, or nod along to. A pulse then technically becomes a beat when individual pulsations are regularly emphasised as strong beats, as opposed to unaccented weak ones: 1, 2, 3, 4, 1, 2, 3, 4 … This recurring pattern is what the time signature essentially dictates.

In most genres of music, no player has a greater responsibility to supply and maintain the pulse and beat than the drummer. This is the foundation of the music you’ll be playing.
 

Tempo
 

How quickly the pulse actually recurs in real time is dictated by tempo, which is usually set at the start of a piece of sheet music. It’s most often indicated in beats per minute  (also known as bpm). An online metronome can help you understand bpm markings.

It’s much rarer to see these in drum sheet music, but there might instead be a verbal marking, such as ‘allegro’. The basic tempo markings section of the Wikipedia article on tempo will help you interpret these instructions.

Combine the metre with the tempo, and you have all the ingredients you need to start feeling your pulse and constructing your beat. Arrange your drum strikes in accordance with that beat, and there you have it - you’re drumming. 
 

Note value
 

The concept of note value was touched on above. Every note is assigned a value, which is reflected in the visual form of the note. The value indicates a note’s length, relative to the metre of the music, and to the bar in which the note appears. There’s a finite value that all the notes in one bar can amount to.

The primary note values are shown below. You'll recognise the crotchets (also referred to as quarter notes), which were used to explain how different drumming actions are notated. You also saw the other values in the graphic that demonstrated the various noteheads.  

Regardless of the note value, if you ever see a dot positioned to the side of a notehead, that indicates that the note should be held for its full value plus a half. A dotted crotchet, for example, should be held for the length of a crotchet plus a quaver.

In the image above, the quavers and semiquavers - or eighth notes and sixteenth notes are standalone, with their value denoted by their flags. But they can also be tied by beams, which we mentioned earlier. The image below depicts beamed notes. 

Let’s use our knowledge of note value to wrap our understanding of time signature. Say a time signature reads 4/4. The top four denotes that there are four beats to every bar, and the bottom four that each beat is equal to a crotchet, or quarter note. 

If the lower number were eight, there’d be four quavers to a bar. If it were two, there’d be four minims - or half notes - to a bar, and so on. That’s why these are called eighth notes and sixteenth notes respectively.

Notes are rarely played constantly. Every good piece of music has a bit of space to it. And for times like this, there are rests. These indicate that the player should pause between notes for a certain amount of time. Rest values correspond to note values, as the graphic below illustrates.

That’s everything that you need to know in order to...

Step 3: Interpret a drum part
 

Of course, in every good drum beat, there are a few things happening. All these aspects - kicks, snares, cymbals - are combined in a particular way, with the drummer handling lots of things at once, coordinating various parts of the kit and combining various interlocking rhythms. 

With that in mind, and with everything we’ve learned about rhythm to hand, we can begin to construct and understand a drum beat. 
 

Example 1

That’s your classic backbeat, thus named because the emphasis provided by the snare falls on the second part of the bar, or towards the back. That beat supplies the rhythmic foundation of the vast majority of popular music. 

Let’s break it down. It’s in 4/4, which means that there are four beats per bar, and each beat’s equivalent to a crotchet. Four crotchets to a bar. 

Each of those four beats is marked by a closed hi-hat strike. Hit that on the beat every beat, and the hi-hat will mark out the pulse. Underneath it we have a kick on beat one, or the downbeat, and a snare on beat three. Those are both played in sync with the hi-hat on those beats, leaving the hi-hat isolated on beats three and four. 
 

Example 2

Let’s take things a step further and attempt to work out the longer and more complicated passage above. There are three bars there, separated by vertical bar lines. Again, each one is built on a backbeat, but there are some subtle changes. 

First, the hi-hat’s been subbed out for the ride cymbal, so you can go ahead and hit that ride on each beat. There are some embellishments on the kick drum too, which are pretty standard variations on the basic pattern. Note the kick on beat four - the upbeat - in bar one, and on beat two in the second bar. 

There’s also a quaver-long hit on the snare at the end of the second bar. To play it, you’ll have to break the bar down into eight units - or each crotchet beat into two parts. The hit falls on the last unit before the downbeat of the third bar, in other words coming halfway between the last hi-hat of bar two and the opening hi-hat/kick combo of the last bar.

Looking at the very end, there’s a flourish on the toms (assuming you have three toms on your kit) that functions as a fill, a kind of short improvisational gesture that usually marks the gap between the sections of a song.

The notes here are triplets, so you’ll have to break that fourth beat down into three equal sub-beats, hitting a tom on each one. It might seem counterintuitive to break the beat into thirds, but it’s a common device, and it’s much easier in practice than in theory. This video explains the concept of triplets in more detail, and demonstrates how to play them.

You might notice that the stems of the notes marking the kick, snare and tom hits all point downwards, while the note-stems of the cymbal strikes point upwards. By grouping notes that match certain parts of the kit and certain aspects of drumming technique, this serves to make the notation tidier, more economical, and ultimately easier to read. 

Crucially, this also makes it easier to interpret the constituent rhythms that come together to create a beat. Drum parts aren’t universally notated in this way, but this arrangement is fairly common. Often you’ll see all the foot-operated actions (kick and hi-hat closure) with downward stems, with everything else pointing up.  

At any rate, this is what drum notation looks like, and much of it isn’t a great deal more complicated than the examples above. If you understand the principles we’ve explored, then you’ll be in a position to apply them to fully fledged drum sheet music, to interpret the notation, play the material and -most importantly - improve as a drummer.

Step 4: Broaden your techniques
 

Knowing the fundamental mechanics of notation is just the first step. Music is a complex business and sheet music has developed nuance to match. Drum sheet music in particular has developed a range of symbols to denote the varied techniques that drumming entails.

As you get better as a player, you’ll no doubt take on more advanced drum parts. And the more advanced the music, the likelier it is that you’ll come across more adventurous and detailed notation.

So, in preparation for those moments, get to know the instructions regarding articulation, expression and technique that are most common in sheet music for the drum kit.

Step 5: In performance
 

Whatever the instrument, there are always a few finishing touches - things more relevant to performance practice than to the musical material itself. You might know the nuts and bolts of reading notation, but you won’t be able to realise a piece successfully unless you take these aspects into account. 
 

Dynamics
 

A major dimension of sheet music that hasn’t been covered is dynamics. In spite of their late entrance here, you should absolutely keep conscious of them. Not only is it essential to handle them properly in performance, but different dynamics bring different technical demands.

The term refers to the volume or, to be more accurate, the intensity of the music. There’s a kind of dynamic continuum, ranging from quiet and soft to loud and powerful. The most common instructions are shown below. Look out for the symbols in the central column, which will appear below the stave.

Repeats
 

Particularly in drum parts for large ensemble compositions, you’re likely to encounter symbols denoting repeats. These clear up the part and prevent you from getting lost in a deluge of notes. All this allows you to concentrate more on actually playing the material, which is particularly useful when you’re sight-reading.

Performance directions
 

Keep an eye out for any text around the stave that instructs you to take action that isn’t included in the notation. You might be told to switch from hard to brush sticks, improvise a drum fill, mute the skin with your elbow, or execute any number of extended playing techniques that the notation just can’t legislate for. 

A really common one that makes all the difference is the swing tempo indication. Swing, which has its roots in jazz music, is a rhythmic alteration that extends the duration of the first quaver of every beat, and reduces that of the second. 

Although the exact changes in duration can vary (there are such things as hard swing and soft swing), swing patterns usually correspond to the rhythm outlined in the notation below. 

Finally, before you stride off into the wide world of drum sheet music, remember that, as a drummer, you’ll be bearing great responsibility. 

In rock, jazz, pop, country, and even musical theatre, the drummer is the individual that the other members of the ensemble will be rhythmically steered by, sometimes even when there’s a conductor in front of them. Time is such a critical parameter of music, and you’ll be the one managing it. So always try to be cool, calm and consistent. 
 

Your next steps for drum sheet music
 

All that remains now is for you to confront some real-life drum kit sheet music. There’s swathes of it in the nkoda library for you to check out, spanning a range of genres, skill levels and ensemble setups.

If you’re starting out not only with reading drum sheet music but also with playing the kit, then you should have a look at easy drum songs for beginners - ten drum lessons there to send you on your way. 

For similar blog content, you might want to check out the hardest songs to play on drums and the best drummers of all time. Get inspired by all the greats and the phenomenal drum music that they played. 

Share this article

Related Articles

5 best apps for drummers on iOS and Android (2022 update)

5 best apps for drummers on iOS and Android (2022 update)

The 2022 series of app countdowns continues. Let's turn to the wonderful world of drumming apps.

Drums
By Ben Maloney

How to read drum sheet music: a beginner’s guide

How to read drum sheet music: a beginner’s guide

From stave to swing, here's everything you need to know to start reading sheet music for the kit.

Drums
By Ben Maloney

10 easy drum songs for beginners to learn

10 easy drum songs for beginners to learn

Start laying down those beats with these ten easy drum tunes.

Drums
By Ben Maloney

10 hardest songs to play on drums

10 hardest songs to play on drums

Mastery of the drums: easy to appreciate, difficult to attain. Players need to match top-level musicianship with refined athleticism, and neither’s easy to come by.

Drums
By Ben Maloney

10 best drummers of all time

10 best drummers of all time

Nothing dazzles like a drummer giving it some. And no one gave it more than these ten legends of the instrument.

Drums
By Ben Maloney

10 best drum songs you need to know

10 best drum songs you need to know

Quicker than a Neil Peart roll, cooler than a Steve Gadd swing, heavier than a Phil Collins snare. Behold ten great performances from the drumming pantheon.

Drums
By Ben Maloney