How to read flute sheet music: a beginner’s guide

07.02.2022 Ben Maloney Flute

The flute is one of the most ancient, widespread and versatile instruments in the world. If you’re an aspiring new player, then you’re about to embark on a special journey.  

Most of the flute music that’s out there, waiting for you to play it, comes in the form of sheet music. In order to interact with that sheet music, then you’ll have to learn to read the notation it utilises, and no doubt that’s why you’ve made your way to this page. 

This article will help you to understand the basics of flute sheet music. It will equip you with the knowledge and tools you need to begin tackling the music that inspired you to pick up the instrument in the first place. Music that will help you become the flautist you hope to be.

Let’s get down to it.

Step 1: Staff notation
 

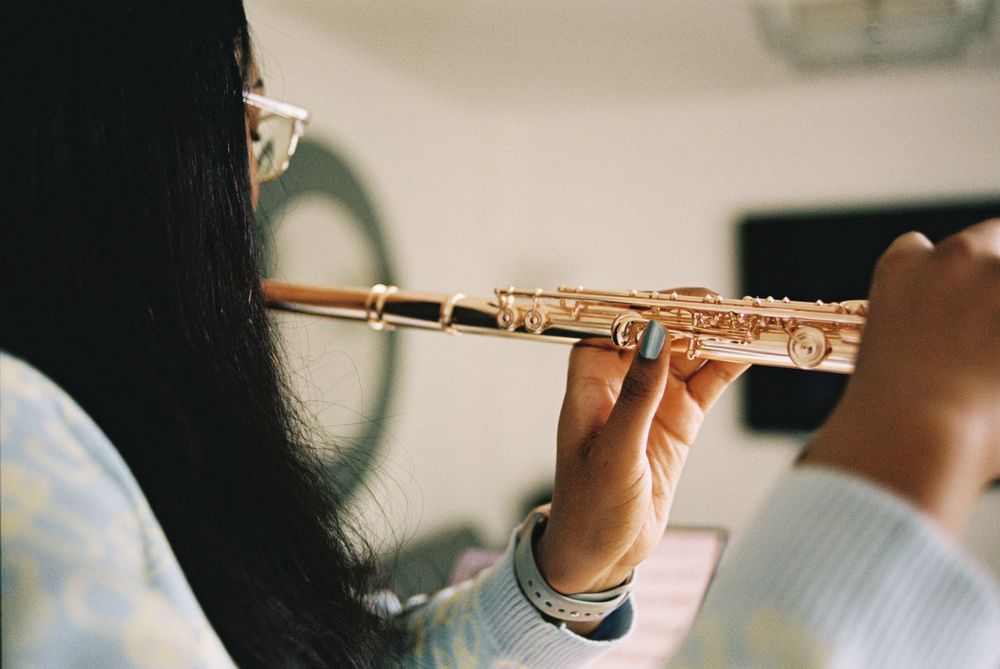
Flute sheet music, while written for the flute, uses staff notation, a system common to all music written in the Western tradition. If you want to learn to read flute sheet music, you’ll need to first learn how to read general sheet music first.

Getting to grips with it is quite a process, involving a range of steps that can take a while to overcome. For that reason, we’re going to condense things a little and focus only on the most fundamental aspects of staff notation here. 

If you’re keen to learn the principles of sheet music in more detail, then you might find this piece on how to read piano sheet music of greater use. It should prove especially handy if you’re planning to engage with classical music on a wider scale, and not just on the flute.
 

How it works 
 

Music in staff notation is written on five parallel horizontal lines. These lines, and the spaces between them, represent fixed musical pitches. Thinking horizontally, they also represent the passage of time - that’s why notes that appear one after the other are played one after the other. These lines are collectively known as the stave, or staff.  
 

Clefs and pitches
 

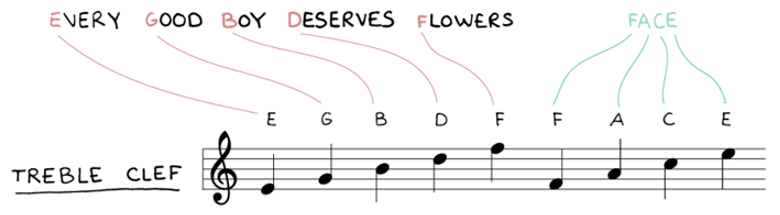
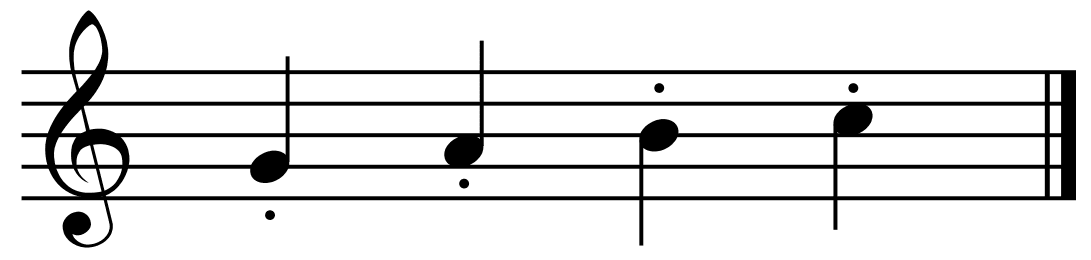
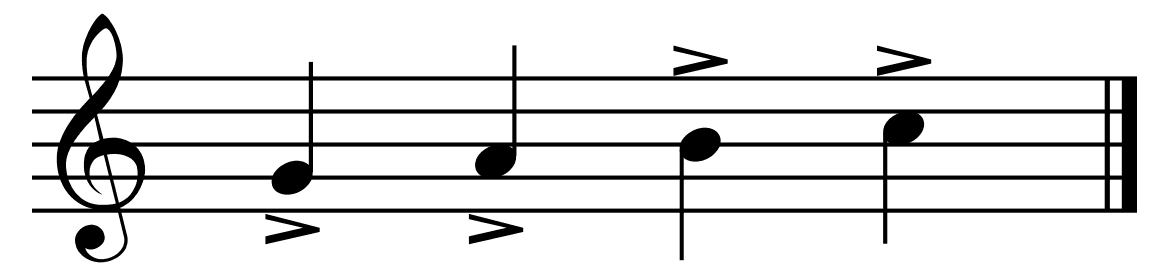
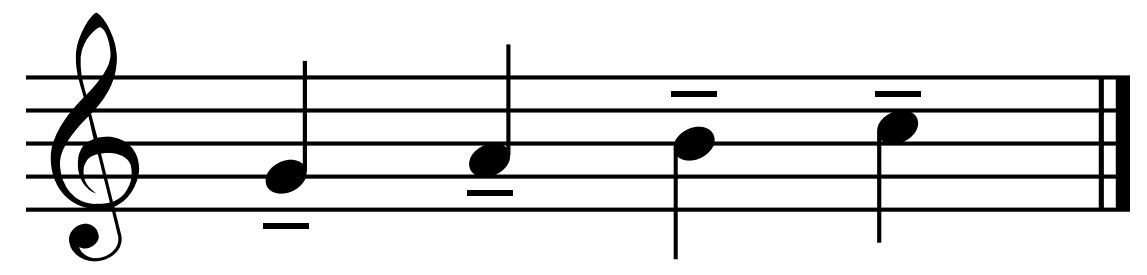
Positioned at the far left of the stave, clefs fix certain pitches to the stave’s lines and spaces. A range of clefs are used in staff notation, such as the bass clef and the alto clef, but flute music uses the treble clef only. You might see it referred to as a G-clef, because it’s actually just an ornately written letter G, which marks that same note. 

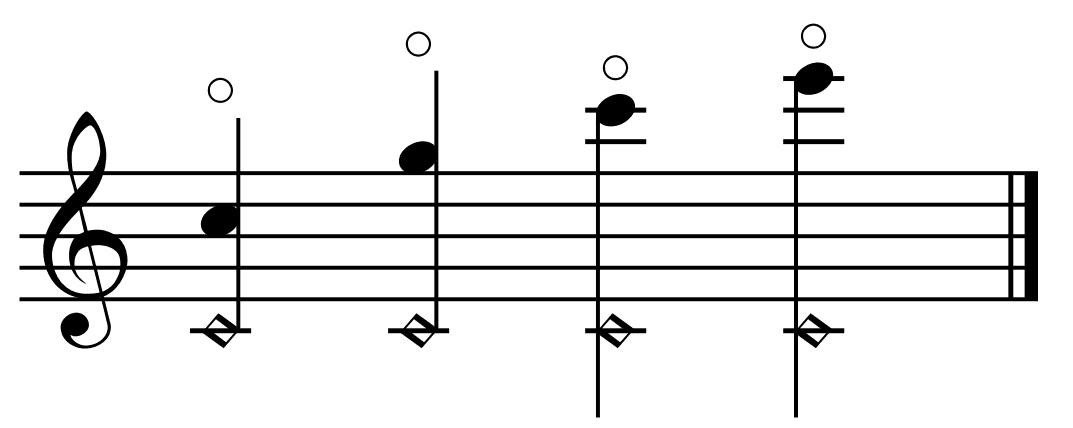
Below you can see this clef in action, with the pitches it assigns to the lines and spaces on the stave. Notes can also extend below and above the stave, and these are common in flute music. They’re written on what’s known as ledger lines.

Notes positioned on the stave, as above, indicate that the corresponding pitch is to be played. The thing to look for is the black circle - the notehead - that marks the intended pitch. All notes have a notehead, but bear in mind that it isn’t always solid like in the image above.

There are some useful mnemonics that can help you memorise the note names. The first letter of each word in every good boy deserves flowers, for example, names the pitches from the bottom line to the top line. The word ‘face’ names the pitches in the spaces, again from bottom to top. These are demonstrated in the image above.
 

Accidentals and key signatures
 

Accidentals are symbols that indicate that the note marked on the stave should be either raised a semitone - or half step - or lowered by one. A sharp (♯) raises a note while a flat (♭) lowers it. A natural sign (♮) cancels out any previous sharps or flats next to the marked note. 

Accidentals can be found next to the note being altered, and apply for the remainder of the bar in which they appear. We’ll come back to bars soon. 

You'll often see some kind of group of flats or sharps at the far left of the stave, next to the clef. This is called a key signature, and it indicates the key of a piece of music, which refers to the group of notes that forms the basis of the piece. 

This article on how to find the key of a song explains what keys are in a little more detail, and how to find them when there’s no key signature given. The graphic below shows the circle of fifths, a diagram that matches keys to their key signatures, while outlining the interrelationships between them. 

You might also want to check out this music theory cheat sheet, which offers more info on accidentals, key signatures, and music theory more broadly. 

Rhythm and time signature
 

We’ve established that the placement of a note on the stave determines the pitch that it instructs you to play. But the way the note itself is written affects the timing and length of that pitch. Now we’re stepping into the world of rhythm.

In staff notation, music is broken down into bars, a concept we ran into earlier. Bars can be thought of as rhythmic building blocks, units of time that make it easier for the player to work through a piece of music. Each recurring bar comprises a particular grouping of strong and weak beats - for instance, 1, 2, 3, 1, 2, 3… 

That particular beat grouping is known as the metre, and that is determined by the time signature. This can be found next to the clef and key signature at the far left of the stave, and it’s made up of two numbers, one placed on top of the other.

The top number indicates the number of beats per bar, while the bottom number assigns a note value to each beat. The notion of note value describes a note's duration relative to the bar in which it appears. The different note values are shown below. 

You’ll recognise crotchets (also known as quarter notes), which were used to outline pitches on the stave. In the image above, the quavers (eighth notes) are tied by beams, but they can also be written as standalone notes, with the flags indicating the note value - as below.  

Regardless of the note value, if there’s a dot positioned to the side of a notehead, that indicates that the note should be held for its full value, plus half of that value. A dotted crotchet, for example, should be held for the length of a crotchet plus a quaver.

So, say if a time signature reads 4/4 - known as common time - there are four beats per bar and each beat is equal to a crotchet. If the lower number were eight, there’d be four quavers to a bar. If it were two, there’d be four minims - or half notes - to a bar, and so on.

How quickly the pulse actually recurs in time is dictated by tempo, which is also usually found at the start of a piece of music. It’s most often indicated in beats per minute, also known as bpm. An online metronome can help you interpret bpm markings. 

Instead, there might be a verbal instruction, such as ‘allegretto’, in which case the basic tempo markings section of the Wikipedia article on tempo will help you to set the tempo of your performance. 

Step 2: Playing the flute
 

Now you’ve encountered the basic principles of staff notation, you’re ready to transfer that knowledge to your concert flute. The first step in this process involves learning how to carry out all these instructions - in other words, how to actually produce the right tones on your instrument.

Moreover, as in the majority of cases, flute music is particular to the instrument. That means that having a working knowledge of sheet music and theory won’t do - you’ll need to familiarise yourself with all the facets of flute-specific notation in order to successfully play through a piece of sheet music. 

We’re jumping ahead though. Beginning that process requires a practical and technical  understanding of what it takes to make music on the flute. That said, if you’re in the rare position where you can play the instrument without being able to read music, then you won’t need to worry about this step.
 

Hand and finger placement
 

The first thing to learn is how to hold the instrument correctly. This is the foundation of good flute-playing, and will help you to get to grips with fingering more quickly and easily. In turn, fingering is the final stepping-stone to interpreting sheet music and actually playing the instrument. We’ll be seeing to that in the next step.

First you’ll need to put your fingers in the correct position. Unlike on the piano or the violin, for example, your hands remain in position when playing the flute, with each digit on both hands responsible for its designated home key. This video will teach you how to match your thumbs and fingers to their home keys.

Then, with flute in hand and those thumbs and fingers in position, adopt the correct standing or sitting posture, bringing the top of the instrument - the head joint - to your mouth. The flute should be pointing to your right, with your left hand approaching from the front and your right hand from behind. 

Sounding and breathing
 

Producing a note involves not only pressing the keys of the flute but also blowing into it. Before taking on the notes themselves, you might appreciate a crash course in this other key aspect of flute technique.

When it comes to actually making a sound, the best way to hone your technique is by detaching the head joint from the instrument and practising with that only. Then you can focus on blowing into the flute without having to worry about fingering.  

Bring the head joint to your mouth and press the lip plate against the underside of your bottom lip. Purse your lips and breathe out, focusing the air on the opposite rim of the embouchure hole. Essentially, you want the exhaled air to split, with half of it going into the hole and half of it flowing over and away from the flute. 

Breathing is key. You want to inhale deeply, absorbing as much air as possible, because you need to fire out a lot of pressurised air in order to sustain a tone. Unless you’re a total natural, it’s going to take a fair few efforts before you can produce a clean sound, but at any rate you’ll get there before long - just persevere. 

Step 3: Flute fingering
 

Having covered music notation as well as finger placement, you’re ready to connect the two. The essence of reading and playing sheet music is knowing how the notes on the page connect to the motions on your instrument. 

Below you’ll see a fingering chart, which might be just about the most valuable reference there is for flute beginners. Learn what’s on it and you’ll be well on your way, so keep it to hand until you’ve committed it to memory. 

Next to each written note that’s playable on a flute, you’ll see an illustration depicting the fingering that produces each note. The keys in the illustration correspond to the keys on your flute. The black keys in the diagram should be pressed, and the white keys left alone. 

Spend as much time as you can not only practising the fingering techniques but also learning the patterns off by heart. To achieve fluency in reading flute sheet music, you’ll need to be able to immediately recall and execute the appropriate fingering, no matter which note appears on the page in front of you. 

Step 4: Articulation
 

Articulation is an aspect of notation and performance that refers to the way in which the notes on the page are expressed. It’s a notion common to all instruments, but flautists will still need to know how to interpret these instructions on the flute.  

So having worked out which note to play and when to play it, the articulation instructions below will then tell you how that note should sound. We’re going to look at a few of the most common and important instances of articulation.
 

Slurs
 

If notes appear next to one another as they’ve been shown so far - with no articulation instructions - then you should separate them from one another by stopping the flow of air into the flute in between the played tones. 

But, if notes are tied by a slur, then you’ll need to move from one note to the next without interrupting the flow. All that changes is the fingering. This creates a smoother gesture with a legato feel. 

Don’t mistake slurs for ties. These look like slurs but they attach two notes marking the same pitch - they indicate that a note should be sustained, usually across the barline or across a strong beat in the bar. 

Staccato
 

In contrast to slurs, staccato dots indicate that notes should be very clearly separated, more so than if there aren’t any articulation instructions. Unlike rhythmic dot markings, which we encountered earlier, staccato dots are placed directly above or below the notehead.

You can achieve this by exhaling short, sharp bursts of air, using your tongue to quickly stem the flow between each one. Mastering your tonguing technique will really help you to handle all kinds of transitions between notes as you take on increasingly complex sheet music.

Accents
 

Accents are easy. They simply tell the player to emphasise a note - to play it with more volume and intensity than the other accented notes around it. For these, just apply a bit more force as you blow. 

Tenuto
 

Unless you’re slurring two notes, there’ll always be some kind of gap between them. Tenuto markings indicate that a note should be sustained for its full length, basically instructing you to minimise that gap as much as possible.

So, if you see these, cut the air flow between notes for the shortest interval possible. Make sure that you take in and maintain plenty of breath so you can navigate a tenuto passage without any issues.

Dynamics
 

While dynamics aren’t technically a branch of articulation, this is the right time to start thinking about them, as you begin to think about how a passage of music is played. They basically prescribe the volume and intensity of a piece, or a part of one. You’ll find the most common dynamic instructions and their meanings below.

All too often dynamics are an afterthought, but it’s crucial to stay conscious how loudly or softly you’re playing - and how loudly or softly you should be playing. 

Step 5: Extended techniques
 

Extended techniques take performance instructions to a whole new level, so much so that you don’t need to worry about them too much just yet. But as you improve as a player and take on more challenging pieces - and you will - you’ll gradually encounter more and more of them.

They involve producing sounds on the flute through more unusual means than your basic blowing and keying. We’re going to explore the extended techniques that composers most frequently demand of performers: flutter-tonguing, harmonics and pizzicato.
 

Flutter-tonguing
 

Flutter-tonguing involves rolling the tongue (an ‘alveolar trill’, technically) - much as you’d  roll an ‘R’ - while playing a note. The effect is that the note is rapidly repeated.

It uses tremolo notation, because this rapid repetition of the note approximates that technique, which is more easily and typically played on other instruments, like the violin. 

Harmonics 
 

Playing harmonics involves exploiting what’s known as the harmonic series to produce a higher tone than the one being keyed. The harmonic series is a sequence of intervals that rises above any given note. When a note is played in a particular way, a harmonic tone in this sequence is sounded. 

On the flute, harmonic tones have a really distinctive, glassy sound. You can produce them by over-blowing a note - that is, exhaling into the flute with too much force. The harder you blow, the higher up the harmonic series the harmonic being sounded will be. 

In notation, the diamond notehead indicates the keyed note, and the round notehead indicates the harmonic sounded, above which is a little open round,

Pizzicato
 

In a flute-playing context, pizzicato describes a motion with either the lips or the tongue that, when combined with a keyed note, produces a sharp, percussive tone. 

Lip pizzicato involves rolling your lips around your teeth before popping them outwards. Tongue pizzicato - or slap-tonguing - on the other hand, involves creating a similar sound by first pressing your tongue to the top of your mouth before quickly releasing it downwards.

There's no universally applied notation for these techniques. But don't worry, most works that call for extended techniques like this will contain instructions in the score that'll tell you what to do when you encounter unorthodox notation in the piece. 


Your next steps for reading flute sheet music
 

That amounts to just about everything you need to know when coming to terms with the fundamentals of flute sheet music. You have the tools you need in order to develop your reading skills, boost your playing ability, and ultimately take a massive step towards your goals as a flautist. 

You might not come across some of the ideas or types of notation that we’ve looked at for a while yet, but when you do, you’ll know just how to rise to the technical challenges they present. 

In short, you’re ready to take on some flute sheet music. There’s a lot of it on nkoda, in a range of genres - classical, folk, pop music and more. If you’re unsure just where to begin, then there are some great playlists full of content suitable for starters. Beginner flute music is the perfect place to kick off. 

Share this article

Related Articles

10 hard flute songs to learn

10 hard flute songs to learn

Presenting ten of the most technically, expressively, and mentally demanding pieces ever written for the flute.

Flute
By Ben Maloney

10 best flute songs of all time

10 best flute songs of all time

The flute may not have inspired quite as much core repertoire as some other instruments, but don't mistake a lack of quantity for one of quality.

Flute
By Ben Maloney

10 best flute players you need to know

10 best flute players you need to know

Ten flautists who wrote the masterpieces, conquered the repertoire, reinvented the techniques and passed on their passion for this very special instrument.

Flute
By Ben Maloney

How to read flute sheet music: a beginner’s guide

How to read flute sheet music: a beginner’s guide

Start playing the music that inspired you to pick up the instrument in the first place with the help of this beginner's guide.

Flute
By Ben Maloney

10 easy flute songs for beginners to learn

10 easy flute songs for beginners to learn

From Béla Bartók to Bette Midler, here are ten easy pieces for the flute that'll see you on your way.

Flute
By Ben Maloney