How to read violin sheet music: a beginner’s guide

22.12.2021 Ben Maloney Violin

The violin is undoubtedly one of the most important instruments in classical music. Playing a leading role in musical practice ever since the Baroque period, it’s the most numerous instrument in the orchestra, a regular fixture in chamber ensembles, and it has a huge solo repertoire.

It also plays a major role in other musical styles, marking countless folk traditions from the USA to India, as well as popular-music genres such as country, disco and Motown. And it’s rarely far away from a film or TV soundtrack. In short, they’re everywhere.

At home with moving lyricism, stormy textures and subtle atmospheres, the violin has come to define so much of the music we listen to. If you’re picking one up for the first time, then you’re becoming a part of this broad and wonderful musical story.

It’s prevalence shouldn’t be taken lightly, though. It’s an instrument that demands care, precision and commitment of its players. It can seem tough when you’re starting out - violins often seem to resist being played at all. But before you know it, you’ll be making it sing.

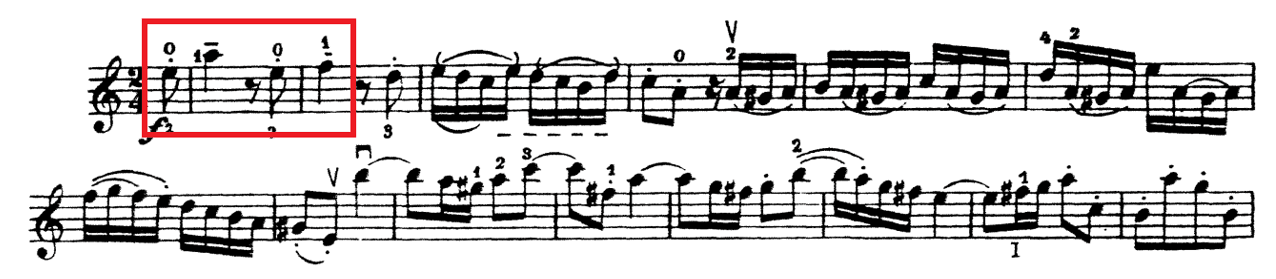
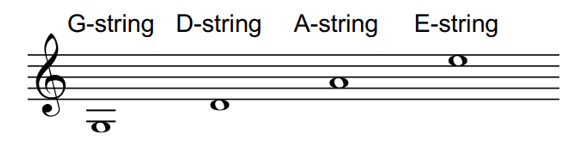
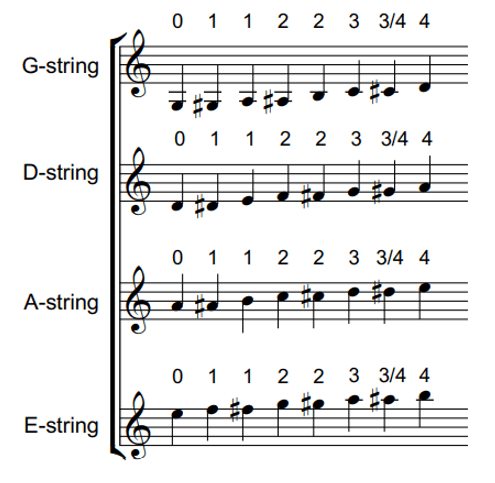
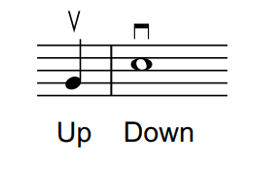
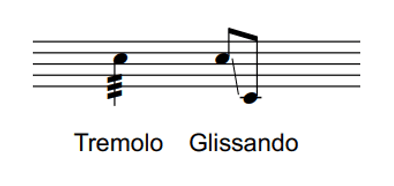
In order to reach that sweet stage, you’ll need to get to grips with violin sheet music. By reading and interpreting it, you’ll be laying the foundations of your practice. And practice lays the foundations of your journey to becoming the violinist that you were born to be. 

Here's your first lesson. Just follow the steps below, and you’ll be there in no time.
 

How to read violin sheet music in 5 steps
 

  1. Sheet music basics
  2. Notes and fingering
  3. Bowing and articulation
  4. Extended techniques
  5. Performance instructions

Step 1: Sheet music basics


Violin sheet music is unique in some ways, but, like the majority of other instruments, it almost exclusively uses staff notation. So, in order to read it, you’ll need to familiarise yourself with how that notation system works.

You don’t have to be a pro before making progress with your violin, but there is a fair bit of theory that you ought to know. For that reason, you might want to skim this guide to reading piano sheet music before trying to understand how those general principles translate to your particular instrument.

Once you understand clefs, signatures, and ultimately how to interpret notes on a stave, then you'll have no problem working your way through the remainder of this article.

Step 2: Finding the notes


Once you’ve absorbed the basics, you’ll be in a position to apply those basics to the violin. To get started, let’s take a look at some real-life violin sheet music. Say, Bach’s Violin Concerto in A minor

You can see how it’s constructed. You know that the violin part’s first four notes are E, A, E and F, and you know when those pitches should be sounded in time, against the metre of the piece. But how to realise all that on the violin? 
 

Open strings


The first and most important thing to come to terms with is how to produce those notes. Like all other string instruments, the violin produces sound through vibrating strings. As your right hand draws the violin bow across a string, making it vibrate, a tone is produced. The pitch of that tone is determined by the thickness and length of the string. 

A violin’s strings are tuned, from thickest to thinnest, to GDA and E - the first below middle C, and the last three above it - as shown in the image below. When they appear in a piece of sheet music, you can sound them by bowing the corresponding string. 

You can see that these notes are written using the treble clef. Almost without exception, violin music is written in this clef, fixing those pitches to those notes. Note that each note is also a perfect fifth away from its neighbours. Helpfully, this brings about consistency when it comes to stopping strings on the violin. 
 

Fingering


By placing your finger on a string, you shorten the length of the vibrating part of it when that string is bowed, increasing the pitch of the tone produced. By using your fingers, therefore, you can realise all the pitches in between and above those open fifths.

When your left hand is at the top of the fingerboard, pressed against the nut of the violin, it’s in first position. From here, you can play all of the notes shown in the image below, (as well as the flat notes enharmonically equivalent to the sharps). There are other positions, which we’ll see to, but for now we’re focusing on first.

Each stave corresponds to a string, and shows the range of notes playable on that string in first position. Above each note you’ll see a number, which indicates the finger used to stop and sound each note. ‘1’ refers to the index finger, ‘2’ to the middle finger, and so on.

Fingering charts like this offer a visual representation of the fingerboard in first position, with the circles marking the various finger positions as well as the pitches they produce. 

You might find it helpful to figure out the positions at the bottom of the diagram, as the pitches they produce can be aligned with the pitch of the next-highest open string. Then you can work your way back up from there.    

Unlike a guitar, for example, violin fingerboards aren’t fretted, so it takes a bit of time to figure out precisely where the different fingers should go. Practice comes into its own here. It’s really important. 

Try to let your ear guide you. Putting stickers on the board also helps, and soon you’ll know where to stop intuitively. Then the stickers can come off - what a feeling that is.
 

Other positions


That was first position, but there are others - seven more, in fact. Changing positions involves moving your hand towards you along the neck of the violin. By doing this, you can not only reach more notes, but also play the same notes in a different way.

In second position, for instance, you would move your left hand slightly towards you, so that your first finger is aligned with where the second finger is usually placed in first position - the third row down in the image above. By doing this, you can play higher pitches on a given string. 

On the E-string, this unlocks entirely new pitches. In first position, you can only reach a high B, but in higher positions you can reach even higher notes, which are often called for in violin music. 

You might also want to play in higher positions for convenience. Although it’s technically possible to play everything below a high B in first position, sometimes producing the same pitch elsewhere on the fingerboard makes for a smoother performance. 

Other positions also come in handy when it comes to finding the right timbre for your performance. A pitch played in fourth position on the G-string will have a very different tone colour to the same pitch played in first position on the D-string. 

Sometimes sheet music will specify particular positions in musical notation, with Roman numerals indicating the position that should be used. But if you’re just starting out on the violin, then you don’t need to worry about this too much. 

Step 3: Bowing and articulation


What your right arm is doing is no less important than what your left hand is doing. Solid bowing technique is absolutely integral to playing the violin well, interpreting sheet music in the appropriate way, and ultimately delivering a great performance.  
 

Bowing technique


You can draw your bow across a string in one of two directions - up or down. An upbow involves pulling the bow from right to left, and a downbow goes the other way. Because it’s easier to perform a downbow with force, notes falling on strong beats in the bar are usually better played with a downbow. The opposite goes for an upbow. 

When you work your way through a series of notes, you broadly alternate your bowing. An upbow is followed by a downbow and vice versa. That’s unless there are bowing markings that indicate otherwise.

When learning a piece of music, you’ll want to work out a bowing pattern. Sometimes the sheet music will offer a helping hand, offering bowing instructions via the symbols above. A retake, usually denoted by a comma above the stave, involves bringing the heel of the bow back to the strings after a downbow, to play another downbow. 

Advanced players master a range of bowing techniques, each one subtly different from the next, and suitable in particular musical situations. You can read more about these techniques in this Wikipedia article on violin technique, but don’t worry too much about it for now.
 

Articulating on the violin


Articulation relates to the way in which a note or a series of notes should be played in performance. Slursstaccato dotstenuto markings, and accents are some of the main examples of articulation instructions. To play violin music, you’ll need to be able to interpret these when you encounter them on the page. 

Notes tied by a slur should be played in the same bow action. Whether that action is an upbow or a downbow depends on the musical context, but in either case the motion will create that legato feel that a slur is supposed to instil. 
 

Ornamentation


This is a kind of subcategory of articulation. Ornaments such as trillsmordents and turns should be played using one bow stroke, as if slurred. The Wikipedia article on ornamentation will help you figure out how to interpret these instructions. 

Staccato dots can be considered the opposite of a slur. Notes with these markings should be played quickly and sharply using a small amount of the bow - you don’t need to draw the entire thing across the strings. 

Notes with accents require emphasis, so for these it’s best to strike these notes with a downbow, close to the bow’s heel. 

Step 4: Extended techniques


Sometimes a piece of music will call for more unconventional violin-playing techniques. Many of these are quite rare, but at the very least it’s good to be aware of them. Then, when they do pop up, you’ll be prepared. 

When you see ‘pizz.’ written underneath the stave, the passage is to be played pizzicato. That means plucking the strings with a finger of your right hand. When it says ‘arco’, you can then resume bowing as normal.

Notes that carry the tremolo marking above should be repeated rapidly for the duration of the note value. Simply move the bow backwards and forwards as quickly as you’re able to.

glissando, denoted by a straight line joining two notes, should be executed by sliding the finger stopping the first note to the position of the next note. It’s an especially satisfying one to play.

Sometimes you’ll see several notes notated in one go, as in a chord. To play two notes at the same time, you’ll need to double-stop. This involves fingering both notes and drawing your bow across two strings. You can also triple-stop and quadruple-stop, but to do that you’ll need to move the bow across each string successively. 

There’s a wide range of possible extended techniques that are called on in the violin repertoire, but it’s best to focus on these basic and common ones for now.

Step 5: Performance directions


Many treat this aspect of interpreting sheet music as icing on the cake. To some extent it is, but the importance of taking this final step shouldn’t be underestimated. It’s what can make or break a great performance. 

So, you’ll need to pay attention to things like tempodynamics and other style markings. It’s one thing knowing what’s meant by ‘forte’ and ‘langsam’, but it’s another being able to realise those instructions with violin and bow in hand. There are a few things that are good to bear in mind.
 

Tempo


Slower music is harder to play than you might imagine. A slow tempo, giving more time to the player, makes for a less challenging performance, right? In one sense it is. You’re more able to prepare for what’s coming next, and material becomes less technically difficult to realise.  

But time also exposes your ability to pitch and your capacity to express. Take care when playing slow music to make sure you’re controlling each tone accurately and shifting from one to the next smoothly.

Although by that logic pitch might seem less prevalent in a fast ‘allegro’, it’s still important to be precise with it. Adhering to rhythm and maintaining a clear sense of pulse is also critical, so make sure you really focus on that, and be economical with your bowing.
 

Dynamics


When playing quieter music, or material marked by directions calling for softer, more delicate playing, such as ‘leggiero’ or ‘dolce’, it’s best to utilise the upper bow. It’s easier to give the music a gentler feel that way.

On the other hand, with louder or more dramatic passages, focus on the lower bow, and don’t be afraid to play strongly and percussively. Sometimes a bit of a scratchy timbre is exactly what the music needs. And the more confidently you play, the more convincing and effective your performance will be.

These are some preliminary ideas to consider, but depth and variety of performative nuance is limitless. Each piece of music presents a unique challenge through its notation. The more you get used to comprehending it, the more easily and naturally you’ll be able to translate the instructions that a piece presents into performance. 

Your next steps for violin sheet music


There’s simply no more effective way to turn all this information into an intuitive ability than by confronting actual examples of violin sheet music. Take on the repertoire and start putting this theory into practice. 

By considering the dimensions outlined here, you’ll give yourself the tools you need to read, understand and realise it. Equipped with those skills, you can then focus on what really matters - learning to play. 

So read, read and read some more. Before you know it, you’ll be scanning the notes and your fingers will be falling when and where they need to, and your bowing arm will be perfectly synchronised with those movements. Soon it’ll all become second nature.

For material that allows you to practise reading sheet music, develop your playing skills, and discover new works, dive into nkoda’s collection of violin sheet music. There’s plenty of beginner violin sheet music there, but if that haul is too intimidating, this article on easy violin songs will make for a great starting point. 

Join the likes of Niccolò Paganini, Anne-Sophie Mutter, George Bridgetower and Itzhak Perlman in the wonderful world of violin-playing. Your journey starts here. 

Share this article

Related Articles

10 easy violin songs any beginner can learn

10 easy violin songs any beginner can learn

Incoming: ten easy pieces for violin, spanning age-old folk tunes, 20th-century miniatures and everything in between.

Violin
By Ben Maloney

Top 10 best violin songs ever written

Top 10 best violin songs ever written

Concerti, sonatas, quartets and film music - ten pieces representing the very best of violin music.

Violin
By Ben Maloney

10 best violinists in the world: the greatest of all time

10 best violinists in the world: the greatest of all time

In the hands of a great player, the violin is able to perform a role like no other instrument. The ten individuals below definitely boast those hands. All of them are undisputedly great violin players, and together they represent arguably the best of the world’s achievements in violin performance...

Violin
By Ben Maloney

10 hardest violin pieces to play

10 hardest violin pieces to play

From caprices to partitas, tightropes to labyrinths, you’re about to confront some of the most difficult pieces of violin music imaginable...

Violin
By Ben Maloney

How to read violin sheet music: a beginner’s guide

How to read violin sheet music: a beginner’s guide

The violin is undoubtedly one of the most important instruments in classical music. Playing a leading role in musical practice ever since the Baroque period, it’s the most numerous instrument in the orchestra, a regular fixture in chamber ensembles, and it has a huge solo repertoire. But you’ll need to get to grips with violin sheet music. Just follow the steps in this article, and you’ll be there in no time...

Violin
By Ben Maloney